EcoVadis submission workflow: scope, evidence and upload logic

Fundamentals | A1
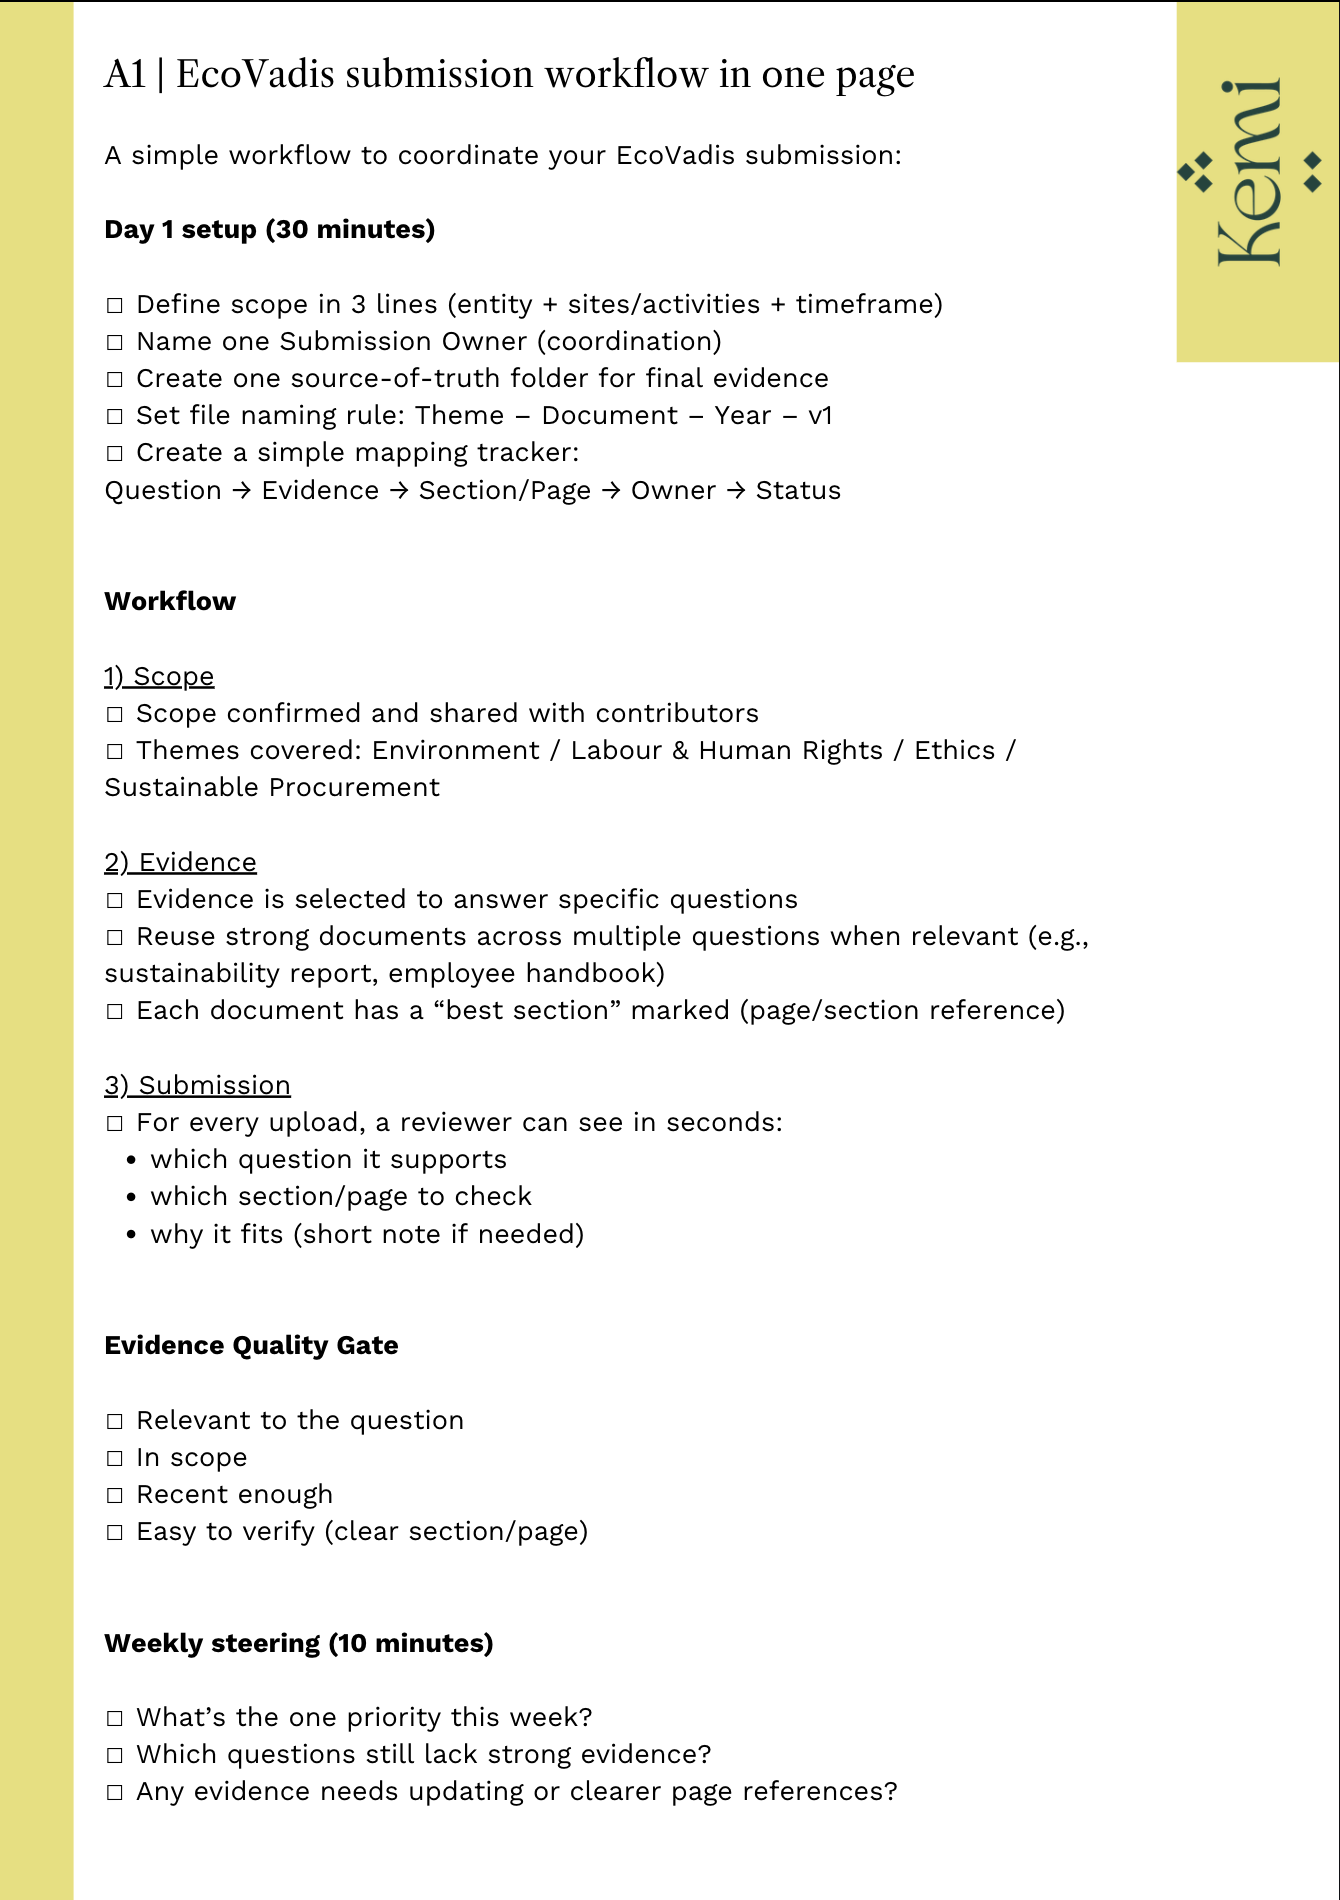
EcoVadis submission workflow in one page
If you’re new to EcoVadis, the fastest progress usually comes from one thing: a clear order. Sheet A1 gives you that order on one page.
Download: Interactive worksheet
Also available: LinkedIn info-carousel version
This guide gives you a clear workflow you can use to coordinate your submission with confidence.
By the end, you’ll know:
what to do first
how to avoid wasted effort
how to keep uploads consistent and easy to review
In 60 seconds: the EcoVadis workflow
A strong EcoVadis submission follows a simple order:
Scope
Decide what the assessment covers.
Evidence
Select proof that matches your scope and the questionnaire.
Submission (upload logic)
Upload evidence with a clear link to each question.
This order is practical because it keeps decisions clean. Scope tells you what counts. Evidence becomes purposeful. Submission becomes consistent.
Why this order matters
EcoVadis rewards structured proof. The easiest way to create structured proof is to work in a sequence that your team can follow.
When the order is unclear, teams often do a lot of activity without building a coherent submission. You can avoid that by treating EcoVadis like a small project with three phases:
define the boundaries
collect the right proof
submit it in a consistent way
The result is not “more effort”. The result is better direction.
Most of the work I do with clients is exactly this part: getting the workflow right the first time.
Details on 1:1 EcoVadis submission support.
Step 1: Scope | What scope means in EcoVadis
Scope is the boundary of what you are being assessed on. It clarifies what is included and what is not.
What ´good` looks like:
You can answer these questions in one minute:
What exactly is being assessed?
Which teams are involved?
What does not belong in this submission?
A clear scope saves time because it stops “nice-to-have” documents from entering the evidence set.
What to do:
Confirm the assessed entity (legal entity / business unit)
Confirm sites or operational boundaries (if relevant)
Agree on the internal owners (who contributes what)
Write it down in one place and share it with everyone involved
Step 2: Evidence | What evidence means here
Evidence is proof that answers the questionnaire. It is not a general collection of sustainability documents.
What to do:
Read the questionnaire as a set of questions that need proof
Collect evidence because it supports a specific question
Keep one source-of-truth folder for final files
Use clear file names that a reviewer can understand (topic + year + version)
What good looks like:
For each file, you can explain:
which question it supports
why it is relevant to your scope
why it is credible and current enough
This makes internal review easier, and it creates a submission that holds together.
Step 3: Submission | What “upload logic” means
Upload logic means your submission is easy to review. Each upload clearly supports a specific question.
What to do
Create a simple mapping: question → evidence → reason
Reuse strong evidence across multiple questions when it genuinely supports them
Example: a sustainability report can support targets, actions and KPI-related questions
Example: an employee handbook can support multiple Labour & Human Rights questions
Keep file naming consistent (topic + year + version), so reviewers recognise the same document when it appears again
Add short notes where helpful: what the reviewer should look for (page/section)
What good looks like:
Reusing the same document across questions is fine. It becomes strong when:
the document is clearly relevant to each question it is used for
it is current and credible
it is easy to find the relevant section (page references help)
Duplicate with purpose, not by habit.
If you can’t explain why a file answers that question, it doesn’t belong there.
Free download: printable workflow checklist
If you want this workflow as a one-page tool, download the printable checklist here.
How to use it
Download the PDF and print it (A4)
File it as the first page in your EcoVadis folder
Use it as your weekly checkpoint while preparing or running your submission
FAQ
Should we start collecting documents immediately?
Start with scope first. Evidence collection becomes faster once everyone knows what counts.
What if we only have a small team?
The workflow stays the same. One person coordinates, others contribute evidence. The structure does the heavy lifting.
Do we need a sustainability report?
Not necessarily. EcoVadis evaluates evidence against questions. Use what you have, as long as it is relevant, credible and current. If you’re missing a clear way to present KPIs, a simple dashboard can help. The Kemi KPI Dashboard template is included in our DIY packages and gives you a structured format you can reuse across KPI-related questions. You can find it in the shop.
What is the single biggest quality lever?
Clear mapping: question → evidence → reason. It prevents irrelevant uploads and makes review straightforward.
How do we keep evidence organised?
Use one source-of-truth folder, clear file names and a simple index (even a spreadsheet works). Use the Progress Tracker to manage the submission itself
Can we use this workflow during re-assessment?
Yes. It works as a refresh workflow and helps you build continuity from one assessment to the next.
Read next
If you want to build on this workflow, these resources help most:
Ownership map: who does what in the EcoVadis project
Document types: policy vs procedure vs results evidence
Evidence recency: how to choose the right time horizon